DIY Laser Cutter and Engraver
The idea for this DIY laser cutter was to build a machine that would be great to produce parts for RC airplanes.

PAGE CONTENTS
Features of the DIY Laser Cutter
This DIY laser cutter is 100% engineered with full detail drawings of every part.
I researched many similar machines and incorporated the better ideas I found. Many thanks are due to Further Fabrication and MW Laser. Take a look at these other examples of DIY laser cutters.
Special thanks to Ronen Borshack. His design, available on GrabCad, was the basis for this design.
I will mention that the designer of this machine (Yours truly!) has over 50+ years of machine design experience so this system is professionally engineered,using the Fusion 360 3D CAD system.
Aluminum extrusion is used for the frame design. This gives an easily built frame that is rigid and can be assembled in the average home workshop.
Timing belts and linear bearings are utilized for the motion activation. This system is inexpensive yet gives fine repeatability for the job at hand.
Specifications
DIY Laser Cutter
- X axis stroke- 900mm(36")
- Y axis stroke- 600mm (23.6")
- Z axis stroke- 280mm(11")
- Laser power-100 Watts
- Length: 1403mm(55.2")
- Width- 946mm(37.2:)
- Height-623mm(24.5")
- Power Req'd-110V/220v 50/60 Hz 15A
Sub Ass'ly 'A'- Basic Frame

The majority of the frame is made up of Misumi 20X20 aluminum extrusions.A few larger members are 20x40 size.
 MISUMI 20x20 EXTRUSION MISUMI 20x20 EXTRUSION |
 MISUMI 20x40 EXTRUSION MISUMI 20x40 EXTRUSION |

A typical corner is shown in the image on the left. (Click on the picture to see a larger PDF image).
Note the T-nut shown in the slot(Item 3). Before the extrusion is closed off at the end, ensure enough T-nuts have been slid in, for future connections.
Ensure every joint is as square as possible. The use of a large machinist square will go a long way to make this possible.
There are a lot of screws to drive! A good quality cordless screwdriver will save your wrist muscles!
Sub-Ass'ly 'B'-Gantry

Hiwin linear bearings were chosen for the X and Y axis,and timing belts are used for actuation.
There a 2 Nema 17 stepper motors used on the X axis an 1 on the Y axis.
Note that a beam splitter is utilized to allow an LED to be used through the lens system to assist in lining up the laser head with the work piece.
Cable carriers are used on both axes to tidy up the wiring.
Sub-Ass'ly 'C'- The 'Z' Axis

Vertical movement is actuated by four lead screws. Power is from two Nema 27 stepper motors. Two closed loop timing belts, connect the motors to the lead screws.
Part of this sub assembly is the Maximum Material Fixture-see photo below.

The fixture can be used for accurately locating balsa and/or ply sheets of any width and up to 36" (914.4mm) long .
The bed is made from perforated metal sheet or alternatively expanded metal sheet. This is attached to an extruded aluminium frame.
Bar magnets are used to locate the balsa/ply sheets.
Piano wire is used to hold down the edge of the sheets. This is particularly required on thinner sheets of balsa, to keep the material edges flat. The magnets keep the wire in place.
The fixture can also be used for parts that are not RC airplane parts. The magnets can position a part any where within the work envelope, so this DIY laser cutter can be used for any cutting or engraving job.
Sub-Ass'ly 'E'- Panel & Miscellaneous Parts

Every panel has a detail drawing and the material shown is 3mm thick MDF.
This is certainly inexpensive and I would suggest painting the panels on both sides.
Of course there is always the danger of fire, from a stray laser beam, but if this should happen then I think it would result in charring rather than flames!
As an alternate thin aluminum sheet can be considered or even vinyl clad aluminum. It all depends on what material can be sourced locally.
Another advantage of MDF is that it can be laser cut-this could be your first project!
The CO2 laser tube is also part of this sub-assembly, along with the duct work for the smoke extraction system.
Sub-Ass'ly 'D'- Electrics

All the electrical components are housed in the rear of the machine and can be accessed by removing the rear left panel.
Follow the instructions issued with each component regarding the wiring connections.
A wiring duct is shown that should tidy up the wires and cables.
The fan is built in and I am not sure it is necessary, but can't do any harm!
Chiller

The 100W laser tube must be cooled down by a water chilling unit. The unit shown above is available from Light Object.
Cost is $465.00USD. Any other unit will do, as long as the specifications are similar.
Smoke Extraction

The photo at left shows the AC Infinity Cloudline S4 4" inline duct fan. This unit could be connected to the ABS pipe on the back of the DIY laser cutter, using flexible 4" piping. The exhaust can be ducted outside or connected to a filtration system.
Airflow is 205CFM.
Bill of Material (BOM)

The BOM consists of 12 pages, listing every part required to build this DIY laser cutter.
Links are included that will connect you to a North American supplier. This means that all duties and taxes should be included in the price as many of the components are manufactured in China.
Note that the price for each part is shown and Sheet 12A gives the total cost for the machine ($6,585.17USD).
Engineering
The total engineering package consists of 113 pages. All are in the PDF format and can be printed out on "A" size sheets.
The BOM is included in the package. If you would like a copy, a small charge of $15.00USD is asked for. Please click on the "Buy Now" PayPal button below, if you would like to purchase the package and I will email it direct to you.

Get Gloster Gladiator Profile eBook Free

Don't worry your e-mail address is totally secure.


Recent Articles
-
The Bristol Bulldog vintage biplane, of the RAF, in 1930
May 22, 23 10:47 AM
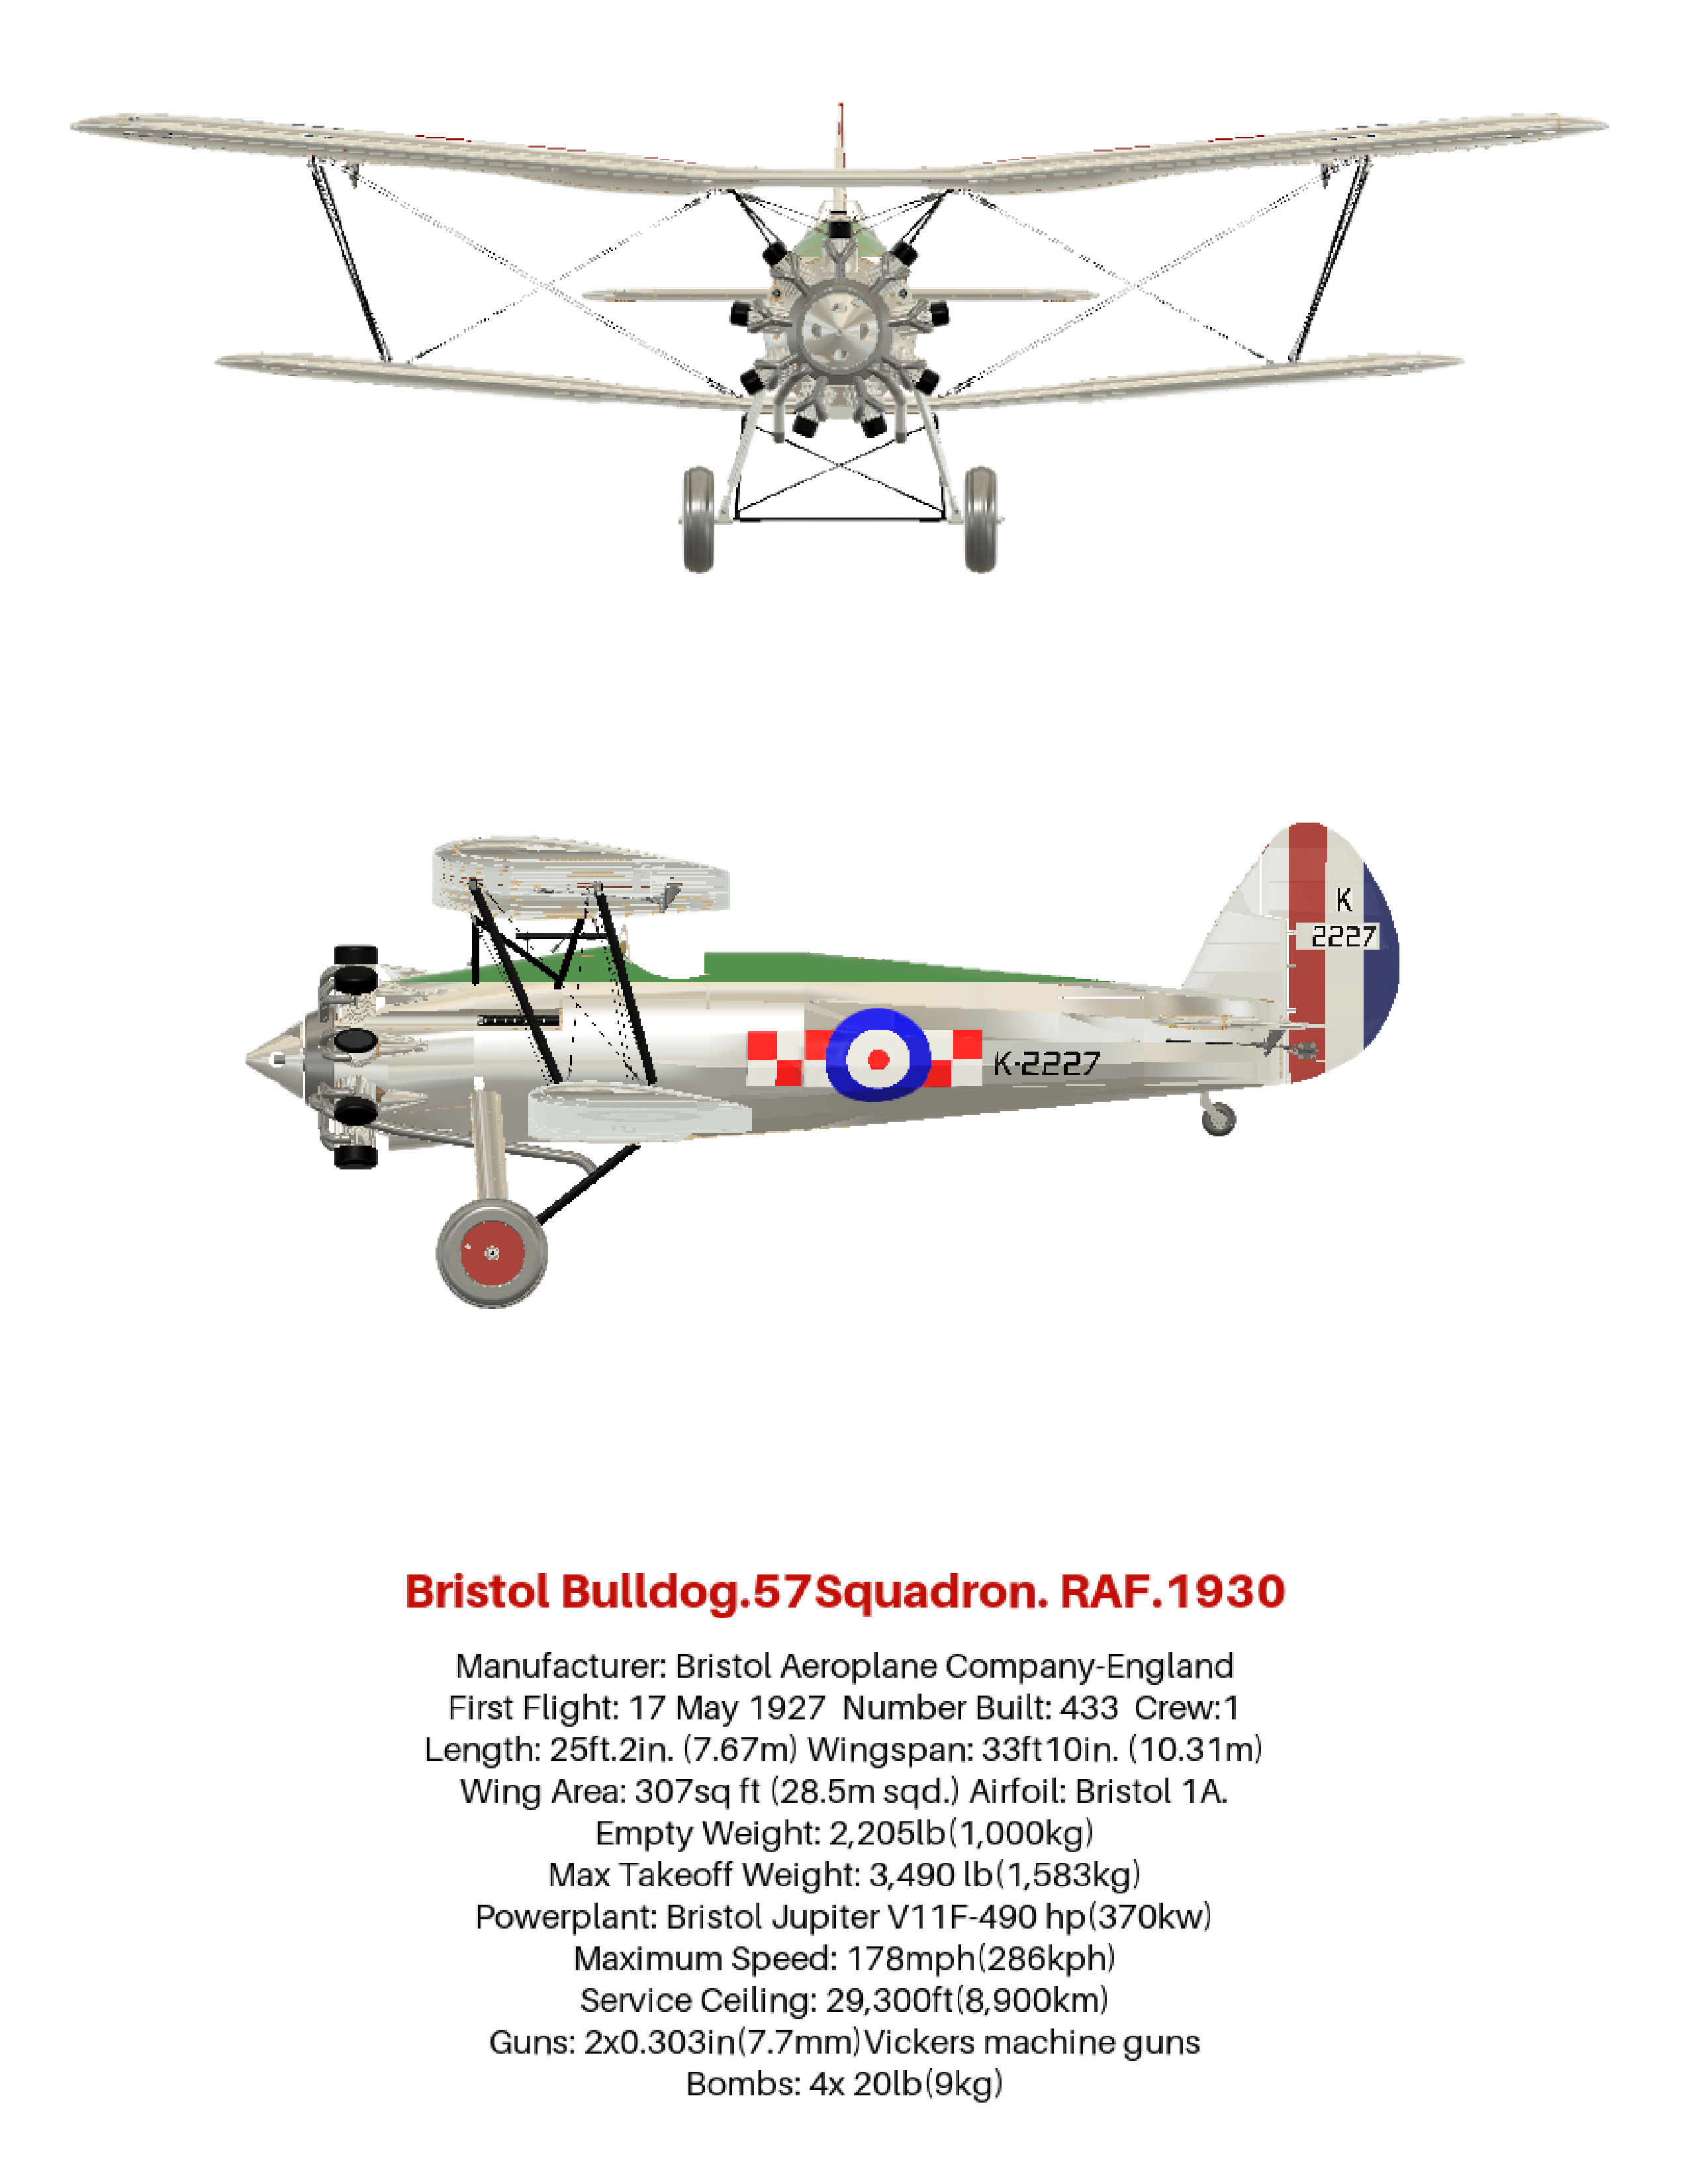 How the aviation art, of the Bristol Bulldog vintage biplane, was produced, using 3D software. Included are photos and links to many aviation gifts, from Zazzle
 -
Aviation gifts For All Airplane Lovers
Apr 20, 23 11:12 AM
 Aviation gifts for every occasion. Give your airplane fanatic friends and relatives the present they will really appreciate! Can be customized to make it truly unique.
 -
RC Retractable Landing Gear: The JP Hobby ER-005 Metal Strut Set.
Dec 19, 22 01:55 PM
 Full details of RC retractable landing gear. For models up to 6 Kg (13.2 lbs). Steerable nose wheel and sequencer for gear doors and brakes. For grass strips.
 -
FLEX RV-8 70CC FLS:ARF and ARFSV.
Nov 02, 22 02:45 PM
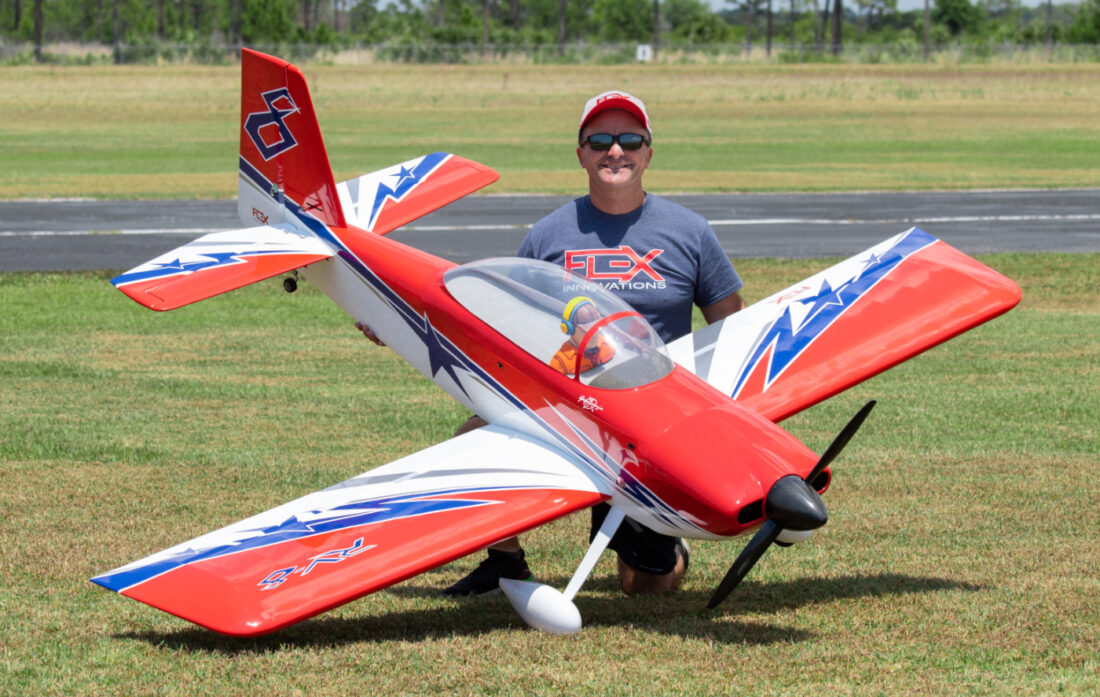 The Flex RV-8 70cc, 35% Scale, 3D RC Airplane. Super lightweight and gas or electric power. Very complete and fast assembly.
New! Comments
Have your say about what you just read! Leave me a comment in the box below.