RC Servos: The Different Types Explained
There are many different styles and types of RC servos available. How to select and install servos in all types of RC airplane.

In today's hobby market place there must be 100's if not 1,000's of different servos available. We shall attempt to simplify the various designs and make some suggestions for different applications.
We shall also take a look at how to mount them and hook them up to the control surfaces.
The photo at left shows the JR Radio 537 Standard Servo. This RC servo has been around a long time and we can use it as a "standard" to compare other servos. It's size category is "standard" (0.73" widex1.52" longx1.32" high) and it is an analog type, with one ball bearing, on the output shaft. Analog was the original design and is rapidly being replaced by the later technology, known as Digital.
The components in both types are identical, the difference is in how the signal from the receiver, is processed and sent to the servo motor. In the analog servo, pulses are sent to the motor at a rate of 50 per second. The digital rate is 300 per second.
The digital types have a reduced deadband, a faster response and quicker and smoother acceleration and better holding power. The downside is that they do use more power and do tend to cost more.
Another point to consider is the type and number of bearings used on the output shaft. Here you will find plain bearings or ball bearings. The ball bearings give lower friction and less stick/slip and a much longer life. The higher quality (and cost!) servos have two ball bearings, and others may have just one.
The type of servo motor will also vary. Coreless motors are faster to respond because the rotating mass of the motor is less giving us faster response time and more available torque. The latest technology is that of brushless servo motors. Once again. response time, speed and smoothness are improved.
OK-let us take a look at the performance specifications for the JR 537 Analog servo. It has a speed of 0.25 seconds for a movement of 60 degrees at a voltage of 4.8V. The torque generated is 40 oz/in. This torque figure means that a force of 40 oz. will be generated at a 1" radius or 80oz at a 1/2" radius.
This servo, with those specs, is good to use in all RC aircraft up to say a 60 size model. If you are flying small park flyers, then this is not the servo to use- for this there are micro or small sizes available.
The Mounting of RC Servos

Use the mounting units that come with the servo. These are the rubber-like "grommets" that will isolate the servo from vibration. If brass ferrules are included also, make sure these are used as well. The flange or head should be place on the bottom, so as it contacts the mounting surface, in the airframe. When the screws are tightened down, the idea is to limit the compression of the grommet. If too tight, then the RC servo will not be isolated, or if too loose it will move about on it's mounting.
Drill holes of 1/32" diameter, before inserting the mounting screws. I always re-enforce the mounting plate in the airframe, as it is usually just 3mm thick lite ply. I cut 3mm thick rectangles of lite ply, about 3/8"x3/4" and glue them in the spot where the holding screws will go. This gives a longer thickness for the screws to "bite".
The Servo arm

The RC servo output arm is the next point to consider, and if this is a high stress installation (say a model, using a glow engine of more than a 60 size), it may make sense to substitute a stronger plastic one or even an aluminum type. One thing to make absolutely sure of, is that it is designed to operate with the servo you are using, from a manufacturer's view point. For instance, the splined output shaft of a Hitec RC servo looks identical to a JR, it will fit but it will also fail! Ask me how I know!
Please take care of the screw that holds the arm to the output shaft and make sure to replace it. in the same make of servo that it came from.
One point to consider is the length of the arm being used. If the length is doubled, the force available is halved and the distance moved linearly is also doubled!

One manufacturer of replacement arms, is Dubro. They make stronger, injection molded arms for a wide range of servo manufacturers. If you click on the photo at the right, you will be taken to the RC Planet website, on the page devoted to Dubro Servo arms. Maybe you will find exactly what you are looking for and you can buy it there too!
So now we have the RC servo, solidly mounted but isolated from vibration. We must consider the overall lever ratio of the system. If the length of the control horns is the same as the radius of the servo arm, where the pushrod actuates, then we have a ratio of 1:1. Thus if the servo moves plus or minus 30 degrees from neutral. then the control surface must move the same. This is a good starting point, with good resolution. If you are fortunate enough to own a computer RC transmitter, you can increase or decrease the servo movement, by using the transmitter computer. If you do not then you can only adjust surface throw by moving the push rod points at the servo and/or the control horn.
The last point to consider, is the electrical hook-up of the RC servo to the receiver. If the servo is mounted in the fuselage, close to the receiver, then there should be no problem with the length of the servo lead. But servos can be mounted in the tail, or in the wings and lead extensions are required.
Use the highest quality you can find, make sure the plugs are compatible and use only the correct length required. Too long leads can cause radio problems and try to clip them to the framework, to stop vibration from causing problems. Wrap the joints with electrical tape or use a commercially available connecter, that keeps the plug and socket together. I have heard of modelers using dental floss to tie the plug and socket together, but I have found the electrical tape to work well.
RC Servo Control Linkage
Ailerons, flaps and tail mounted units generally have short connections to the servos. Piano wire is a natural method of construction, with the end connections to suit the type of control horn used. Some form of kwik-link can be used, at either or both ends, as long as there is a way to adjust length to optimize the set-up. All connections must be stiff and friction-free and easily handle the flight loads with no deflection. The smaller the RC airplane then the simpler and lighter the RC servo connection system can be. The giant scale RC airplanes are probably the most demanding, but specialized hardware is available.

This photo shows Dubro 4-40 heavy duty ball links, that can be used in a variety of locations. If you click on the photo, you will be taken to a page on the PC Planet site that lists a lot of Dubro servo connection hardware. Note that Dubro has been around a long time and make an excellent product that can be depended upon, when used in the correct application.
For the longer connections, generally in the fuselage, we need a rigid connection, that is adjustable for length and easy to install. If the fuselage you are using, is completely covered in (such as a fiberglass job), then your choice may be limited. I am thinking of the plastic tube in tube types, manufactured by Sullivan Products and others.
I have used these for years, with complete success, in a wide variety of RC airplanes up to and including 1/4 scale RC. However, all the models were built from plans or self-designed and I had access to the fuselage interior, so I could support the outer tube, every 6"to 8", along its length. This is essential to prevent "bowing" and the subsequent control surface deflection. This support (generally a balsa stick glued crosswise, across the fuselage) can be very difficult to reach, inside of a closed in fuselage. The quarter scale Model used the carbon filled nylon core and worked to perfection.

For the closed in type of fuselage, the type of pushrod that does not need any kind of intermediate support can be manufactured from hard balsa (smaller models) or wooden dowel rod (larger types). Dave Brown Products Inc. offers a tubular fiberglass hollow rod, complete with end fittings, that makes into a superb RC servo pushrod.

The next type of system to consider, is the "Pull/Pull" system. This uses a horn on each side of control surface and a double sided servo arm. Plastic covered fishing wire or fine Kevlar is used to connect the horns to the servo arm and generally running through small diameter plastic tubes. When installing these systems, make sure the cable is tight, throughout the complete range of movement.
The photo at the right, shows the Dubro system.
The final system to look at is the throttle cable for the glow and RC gas engine. Sullivan Products make a range of products for this application, consisting of a plastic tube, with a flexible wire inner. The plastic tube must be well supported and keep the tube as straight as possible. I prefer to use a plastic nylink at the throttle end( If the throttle arm is steel.)
One tip I will pass along regarding setting up the throttle travel. Start with the RC servo and the throttle arm at the mid point of travel. First set-up the high throttle position by adjusting the radius point on the arm(s). If you have a computer radio, simply adjust the servo travel. Then set up the low throttle point and I prefer to use the throttle trim function to "cut" the engine. Make absolutely sure that the servo is not "bottoming-out" at extremes of motion. I find that by starting at the mid-point makes this set-up a lot easier.
If you are building ARF RC planes, then usually, the pushrod system is provided for you. Sometimes I find the system supplied leaves something to be desired, so I do not hesitate to replace a potentially defective arrangement and I will not compromise safety!
The Types and Sizes of RC Servos Available

As I mentioned, at the beginning of this page, the range of servos available today is HUGE! The RC servo shown here is a large type, intended for giant scale RC airplanes that are fully capable of 3D RC aerobatics.
This class of model is probably the most demanding in the RC hobby. This RC servo is enclosed in an aluminum case and produces 480oz/in of torque. Transit time for 60 degrees is a mere 0.12seconds at a voltage of 7.4V. The high voltage means that a 2S lipo battery can be used, without a voltage regulator.
This model has all the preferable attributes- it is digital, has a coreless motor, dual ball bearings and metal geared. The total weight is 2.6oz.

Here we have a mini size RC servo, primarily intended for electric RC planes. It is manufactured by Hitec and is analog with ball bearings and metal gears. Speed is 0;14seconds for 60degrees and has an output torque of 54oz/in. the weight is 1.1oz.
I did not intend for this page to ramble on for so long! For details on high torque, high voltage servos, please click here.

Get Gloster Gladiator Profile eBook Free

Don't worry your e-mail address is totally secure.


Recent Articles
-
The Bristol Bulldog vintage biplane, of the RAF, in 1930
May 22, 23 10:47 AM
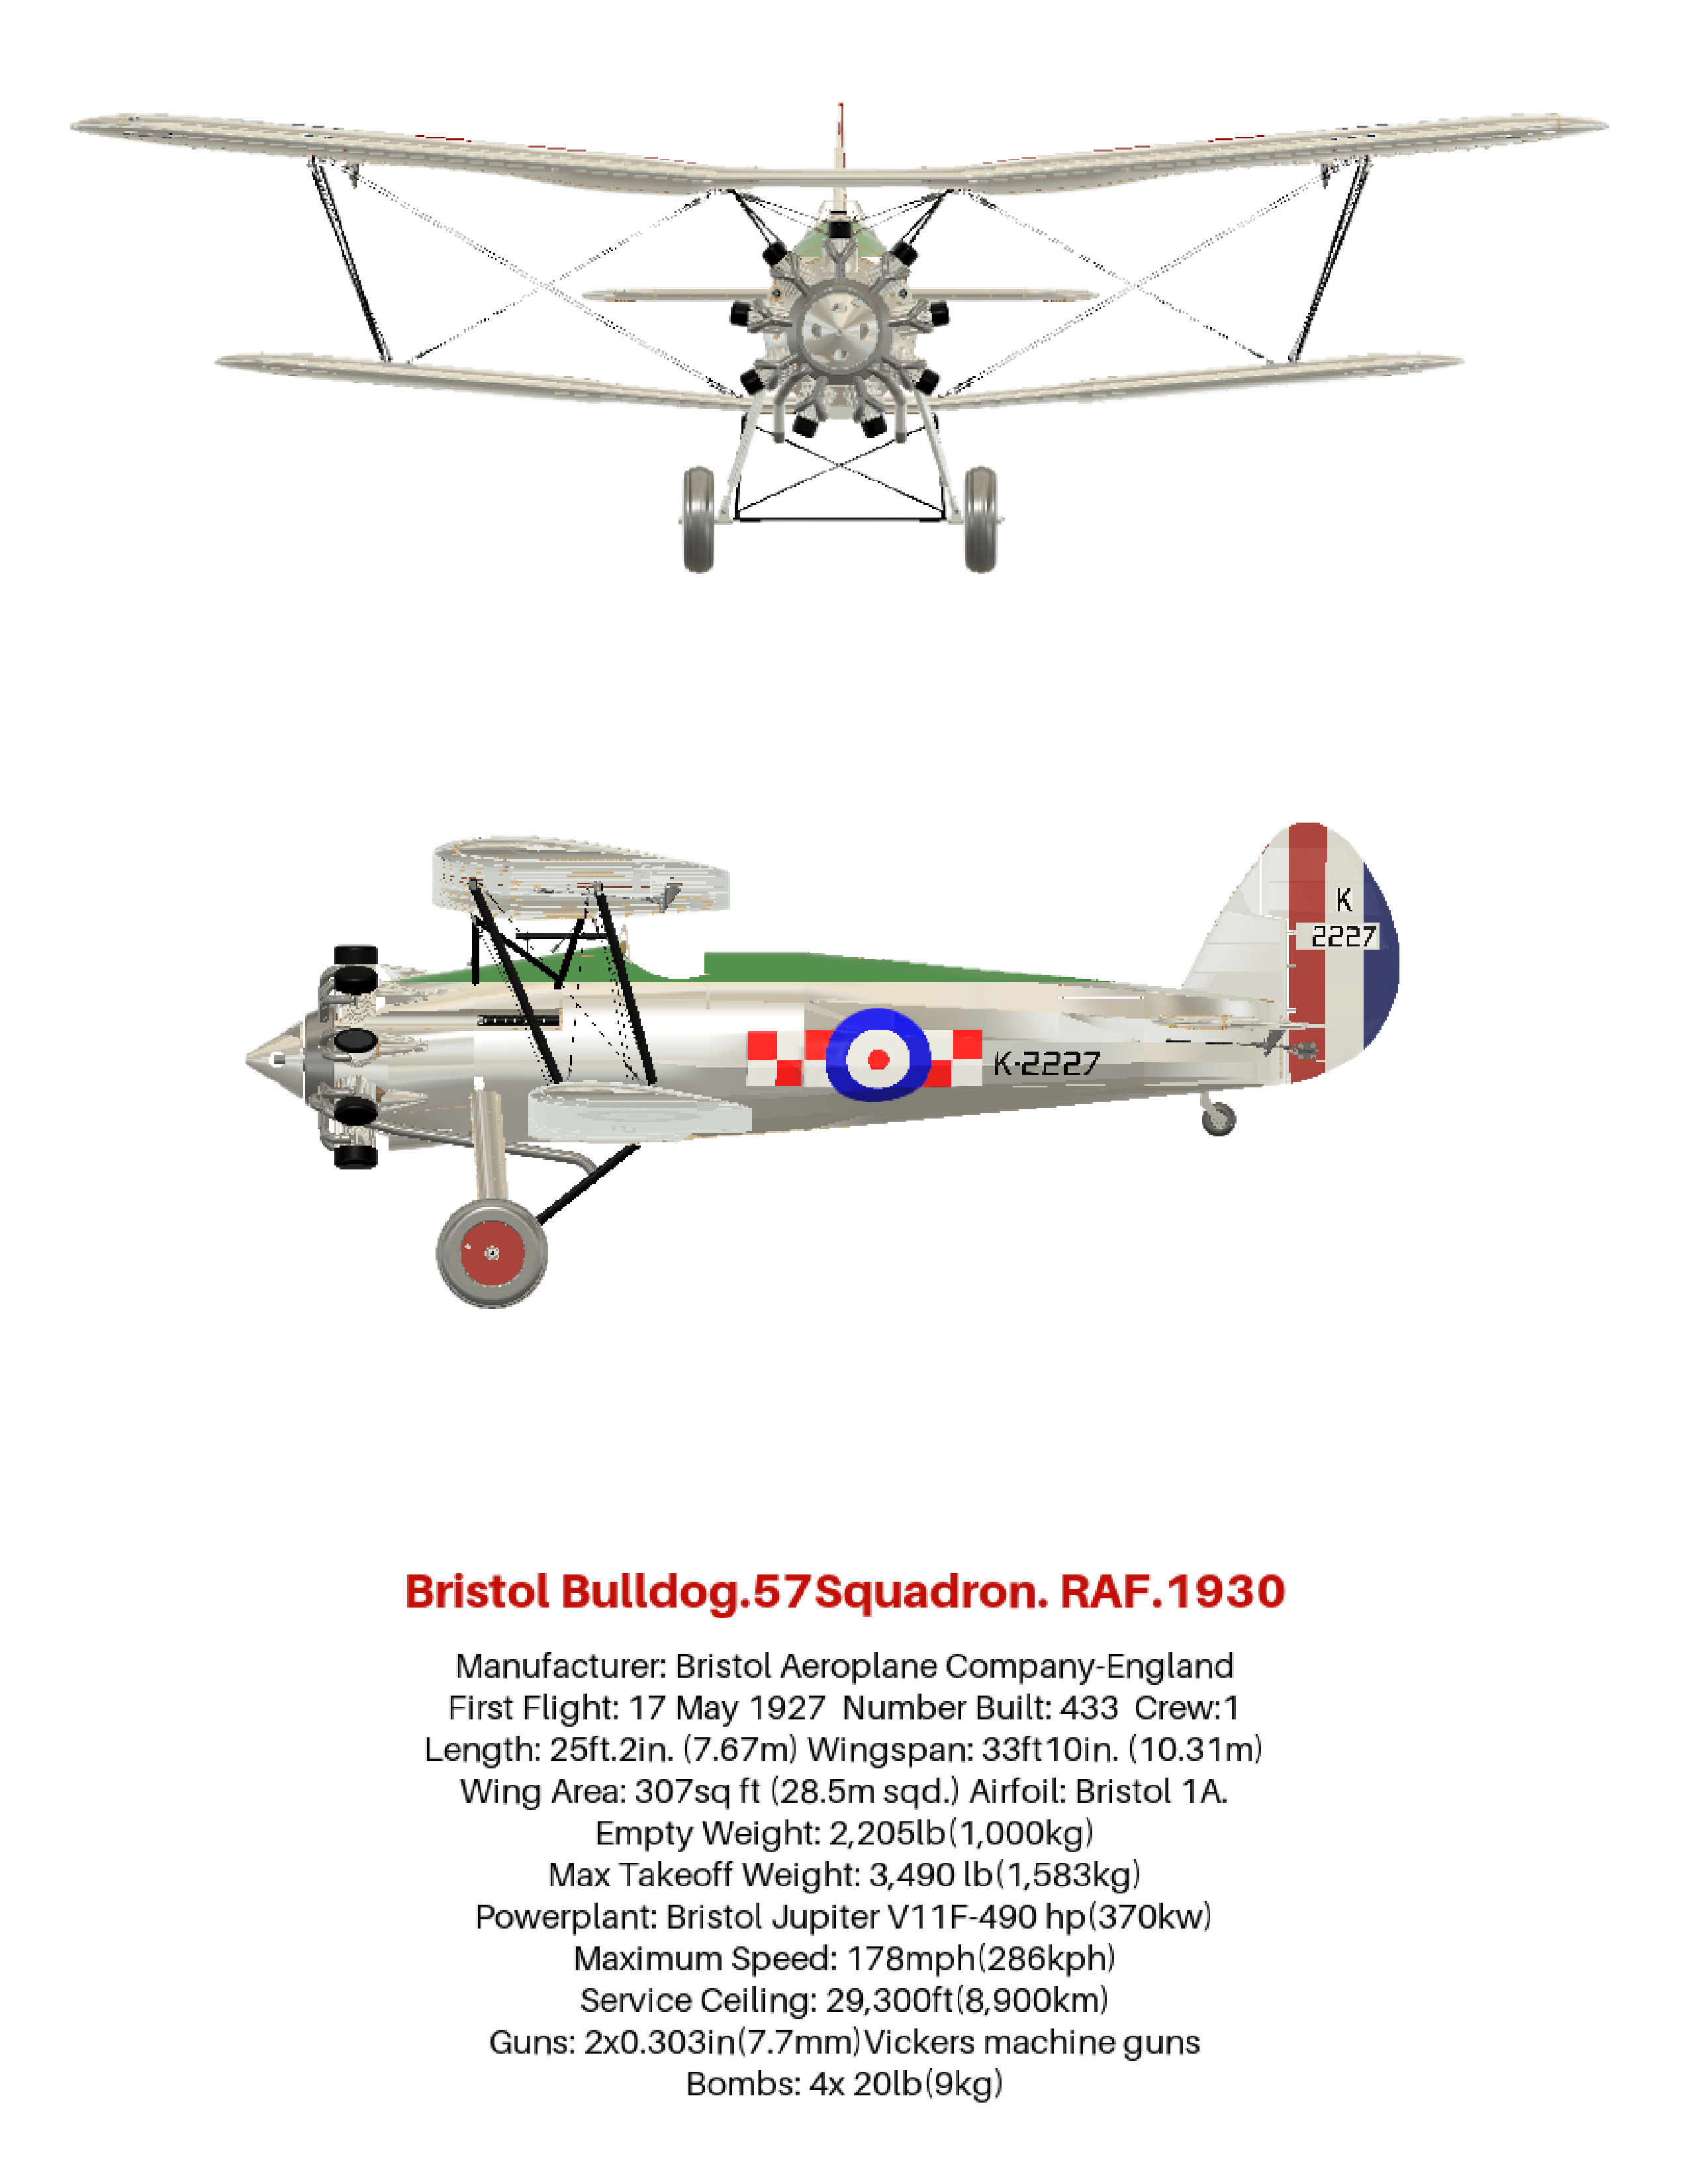 How the aviation art, of the Bristol Bulldog vintage biplane, was produced, using 3D software. Included are photos and links to many aviation gifts, from Zazzle
 -
Aviation gifts For All Airplane Lovers
Apr 20, 23 11:12 AM
 Aviation gifts for every occasion. Give your airplane fanatic friends and relatives the present they will really appreciate! Can be customized to make it truly unique.
 -
RC Retractable Landing Gear: The JP Hobby ER-005 Metal Strut Set.
Dec 19, 22 01:55 PM
 Full details of RC retractable landing gear. For models up to 6 Kg (13.2 lbs). Steerable nose wheel and sequencer for gear doors and brakes. For grass strips.
 -
FLEX RV-8 70CC FLS:ARF and ARFSV.
Nov 02, 22 02:45 PM
 The Flex RV-8 70cc, 35% Scale, 3D RC Airplane. Super lightweight and gas or electric power. Very complete and fast assembly.
New! Comments
Have your say about what you just read! Leave me a comment in the box below.