Building radio controlled airplanes from plans
The building of radio controlled airplanes from a plan, is somewhat different, as compared to building from a kit.
The airplane plans will be more detailed than the assembly drawing that is usually supplied with most kits. It must show every part, full size.
 Photo is by Cameron Mall
If you prefer, you can make your own kit, by cutting out all the parts, or you can use a custom laser cutting service. See how to select a supplier to custom make the parts by visiting this page.
The rang of radio controlled airplanes available, from plans suppliers, is much larger than is generally available from manufacturers of kits or ARF airplanes.
There are many plans companies that specialize in scale large RC model airplanes such as Nick Ziroli Plans and Jerry Bates Plans. Both of these companies have an excellent reputation for airplane plans, that are buildable and easy flying. Don't forget my range of plans! Take a look here
Transferring the Part Shape
If you decide to produce your own kit, then you must transfer the part shapes to balsa and ply.
Carbon paper can be used (If you can find some-does any one use this stuff any more?) I have also used a pin to pierce through the plan into the wood, but this does mark the plan.
There is a product called SEE TEMP that is especially useful. It is a clear, stiff, plastic material, that is laid over the plans and the part shape can be traced or scored onto the plastic. The parts for your radio controlled plane can then be cut out of the plastic and used as a template. this is especially useful for multiple parts. This material is now available from Dynamic Balsa. Visit their website for full information.
You can also cut the part shape directly from the plans and use a glue stick to adhere the paper to the wood. If you do not wish to cut the original plans the you can photo-copy the relevant parts. Please ensure that the copies are the same scale as the original.
A tip I learned from Top Flite is to have a small scale version of the plans available for reference. when you are building your radio controlled masterpiece, the plans do tend to be obscured with the part you are building and tools etc. If you are building from a set of my plans then I will make a set of small scale plans available to you. When you have parts being built over the plans it is very useful to be able to refer to this small set. Use the form on the "Contact us" page and I will make sure you receive a set.

Getting Organized to Build Radio Controlled Airplanes
The best way to approach the project, is to make yourself the "PRIME CONTRACTOR" for building the radio controlled plane.
If you have decided to use a laser cutting service then order the parts.
Take a look at the hardware requirements-if you need to purchase parts, then start a list. (Wheels, tank, control horns, etc, etc,)
Please note that stock size balsa and hardwoods need to be obtained, as well. The advantage you have now, is that you can choose the best balsa for the job at hand!
Never use the rock-hard balsa, that a lot of hobby shops seem to stock. The nice medium grades will do well, in most applications, and the softer grades will bend easier, without splitting, making them good for sheeting.
Please realize that the final weight of the complete model is, to a large extent, determined at this stage. Select the wood carefully and for its application!
If other parts need to be made-to-order, then now is time to get them organized and on order.
Before starting construction it is necessary to protect the radio controlled airplane plans from glue and adhesive. Wax paper has been used for this purpose and works well.
Adhesives to Use
Cyanoacrylates

For all the balsa to balsa joints there is really only one glue to use. I refer of course to the CA glue. CA is an acronym for CyanoAcrylate. The most popular form is "Crazy Glue", but do not use this for radio controlled airplane construction.
The local hobby shop will stock a wide range of CA glue. "Hot Stuff "and "Zap" are examples of glues that are especially formulated for model construction. They are available in three thicknesses- thin for general construction, medium and thick. The thicker grades will dry slower and fill larger gaps than the thin.
An accelerator is also available, but be careful, too much use can make the joints brittle and weak.
Thin CA must have tight joints to allow the glue to "wick" and penetrate. Under these conditions the set time is almost instant.
Please use in a well ventilated area. A small fan is a great idea to blow the fumes away. Some people find themselves allergic to the fumes. There is a grade of CA that is odorless. It is primarily used for joining foam parts (regular CA will melt foam) If even the odorless type is a bother to you then I am sorry to say that CA is not for you!
Aliphatic Resins

The alternative glues to consider in the construction of radio controlled airplanes are the ALIPHATIC RESIN glues, such as Titebond and Elmers. Before the CA glues were available this and model airplane glue were the only glues available for constructing radio controlled airplanes.
For hardwood and plywood joints these white glues are the way to go. As these joints will not allow the adhesive to penetrate, CA may not be the first choice. The drawback is drying time. White glue can take up to 24 hours to set completely! During this time the parts must not move and some form of clamping is required.
One use for the white glues that may be unique is that of laminating by using heat. A thin coat is applied to both surfaces and allowed to dry. (Thin with water to a cream like consistency) Now use your iron to activate the adhesive and bond the two surfaces together.
I have successfully used this technique for the following applications-
- Bonding 1/16 inch sheeting to a foam core.
- Applying 1/16 inch sheet to a wing leading edge, over ribs.
- Laminating balsa to make "balsa plywood"- e.g. 3-layers of 1/16 inch balsa to replace 3/16 inch balsa sheet. Lighter and much stronger!
Epoxy Resins

The final adhesive to consider for use in constructing radio controlled airplanes are the EPOXY RESINS. These are used where maximum joint strength is required. Attaching the firewall bulkhead to the fuselage, joining wing panels, gluing the tail plane to the fuselage. These are examples of where to apply epoxy.
Epoxy resins are usually supplied as a two part mix. Mix equal amounts on a plastic or disposable surface using a spatula. Use rubbing alcohol as a solvent to clean-up. They are available in different drying times.
5 Minute Epoxy is used the most in my workshop. This is the weakest of the epoxies, but still more than strong enough for the majority of applications.
30 Minute Epoxy is the highest strength glue I use. It is also used, thinned 50/50 with rubbing alcohol, to fuel proof all wooden structures within the engine compartment.
As well as using for radio controlled models projects, these glues are excellent for other projects.

Finishing Resin is also an epoxy that is easy to sand and is primarily used for surface finishing of radio controlled airplanes. If there are sheet covered surfaces that will later be painted then some form of primer or under surface is required. Finishing resin, thinned 50/50,(use Rubbing Alcohol as a thinner), can be applied direct to balsa surfaces or used with light (1/4 oz.) fiber glass cloth.
This 50/50 mixture is also an excellent fuel proof sealer. I use it for inside the engine bay and around the firewall, on glow powered planes.
Companies that I can recommend when building radio controlled airplanes from plans
For aluminum landing gear and wing tubes for radio controlled airplanes- www.tntlandinggear.com
For excellent 2-stroke and gas engine mufflers-http://www.bissonmufflers.com/en/index.html
Pages of Interest

When the framework of your radio controlled airplane has been built from the model airplane plans, you will need to consider some kind of model airplane covering, either a fabric or a film, like monokote.

If you would like to add details to your model, such as rib stitching and rib tapes, or apply a realistic aluminum finish, or apply panel lines and rivets to your scale RC airplanes. Visit this page for more details.

To finish off, your pride and joy, add that finishing touch-those special model aircraft decals. Read how to select and apply them.

Laser cut model airplane parts are available from many sources. Read about how lasers work and how to select a cutter for your project.

How to apply film and the tools required for success. This page is full of tips and useful techniques for covering radio controlled airplanes.

Get Gloster Gladiator Profile eBook Free

Don't worry your e-mail address is totally secure.


Beginner's
Guide To Flying RC Helicopters is the heli-equivalent to the above
ebook - the ultimate 'getting started' heli guide!
Click here to view more details
Beginner's
Guide To Flying RC Airplanes is the essential eBook for anyone
looking at getting in to flying RC airplanes. Step-by-step guidance on all you
need to know about getting in to this fun and exhilarating hobby. Written by
Peter Carpenter.

Recent Articles
-
The Bristol Bulldog vintage biplane, of the RAF, in 1930
May 22, 23 10:47 AM
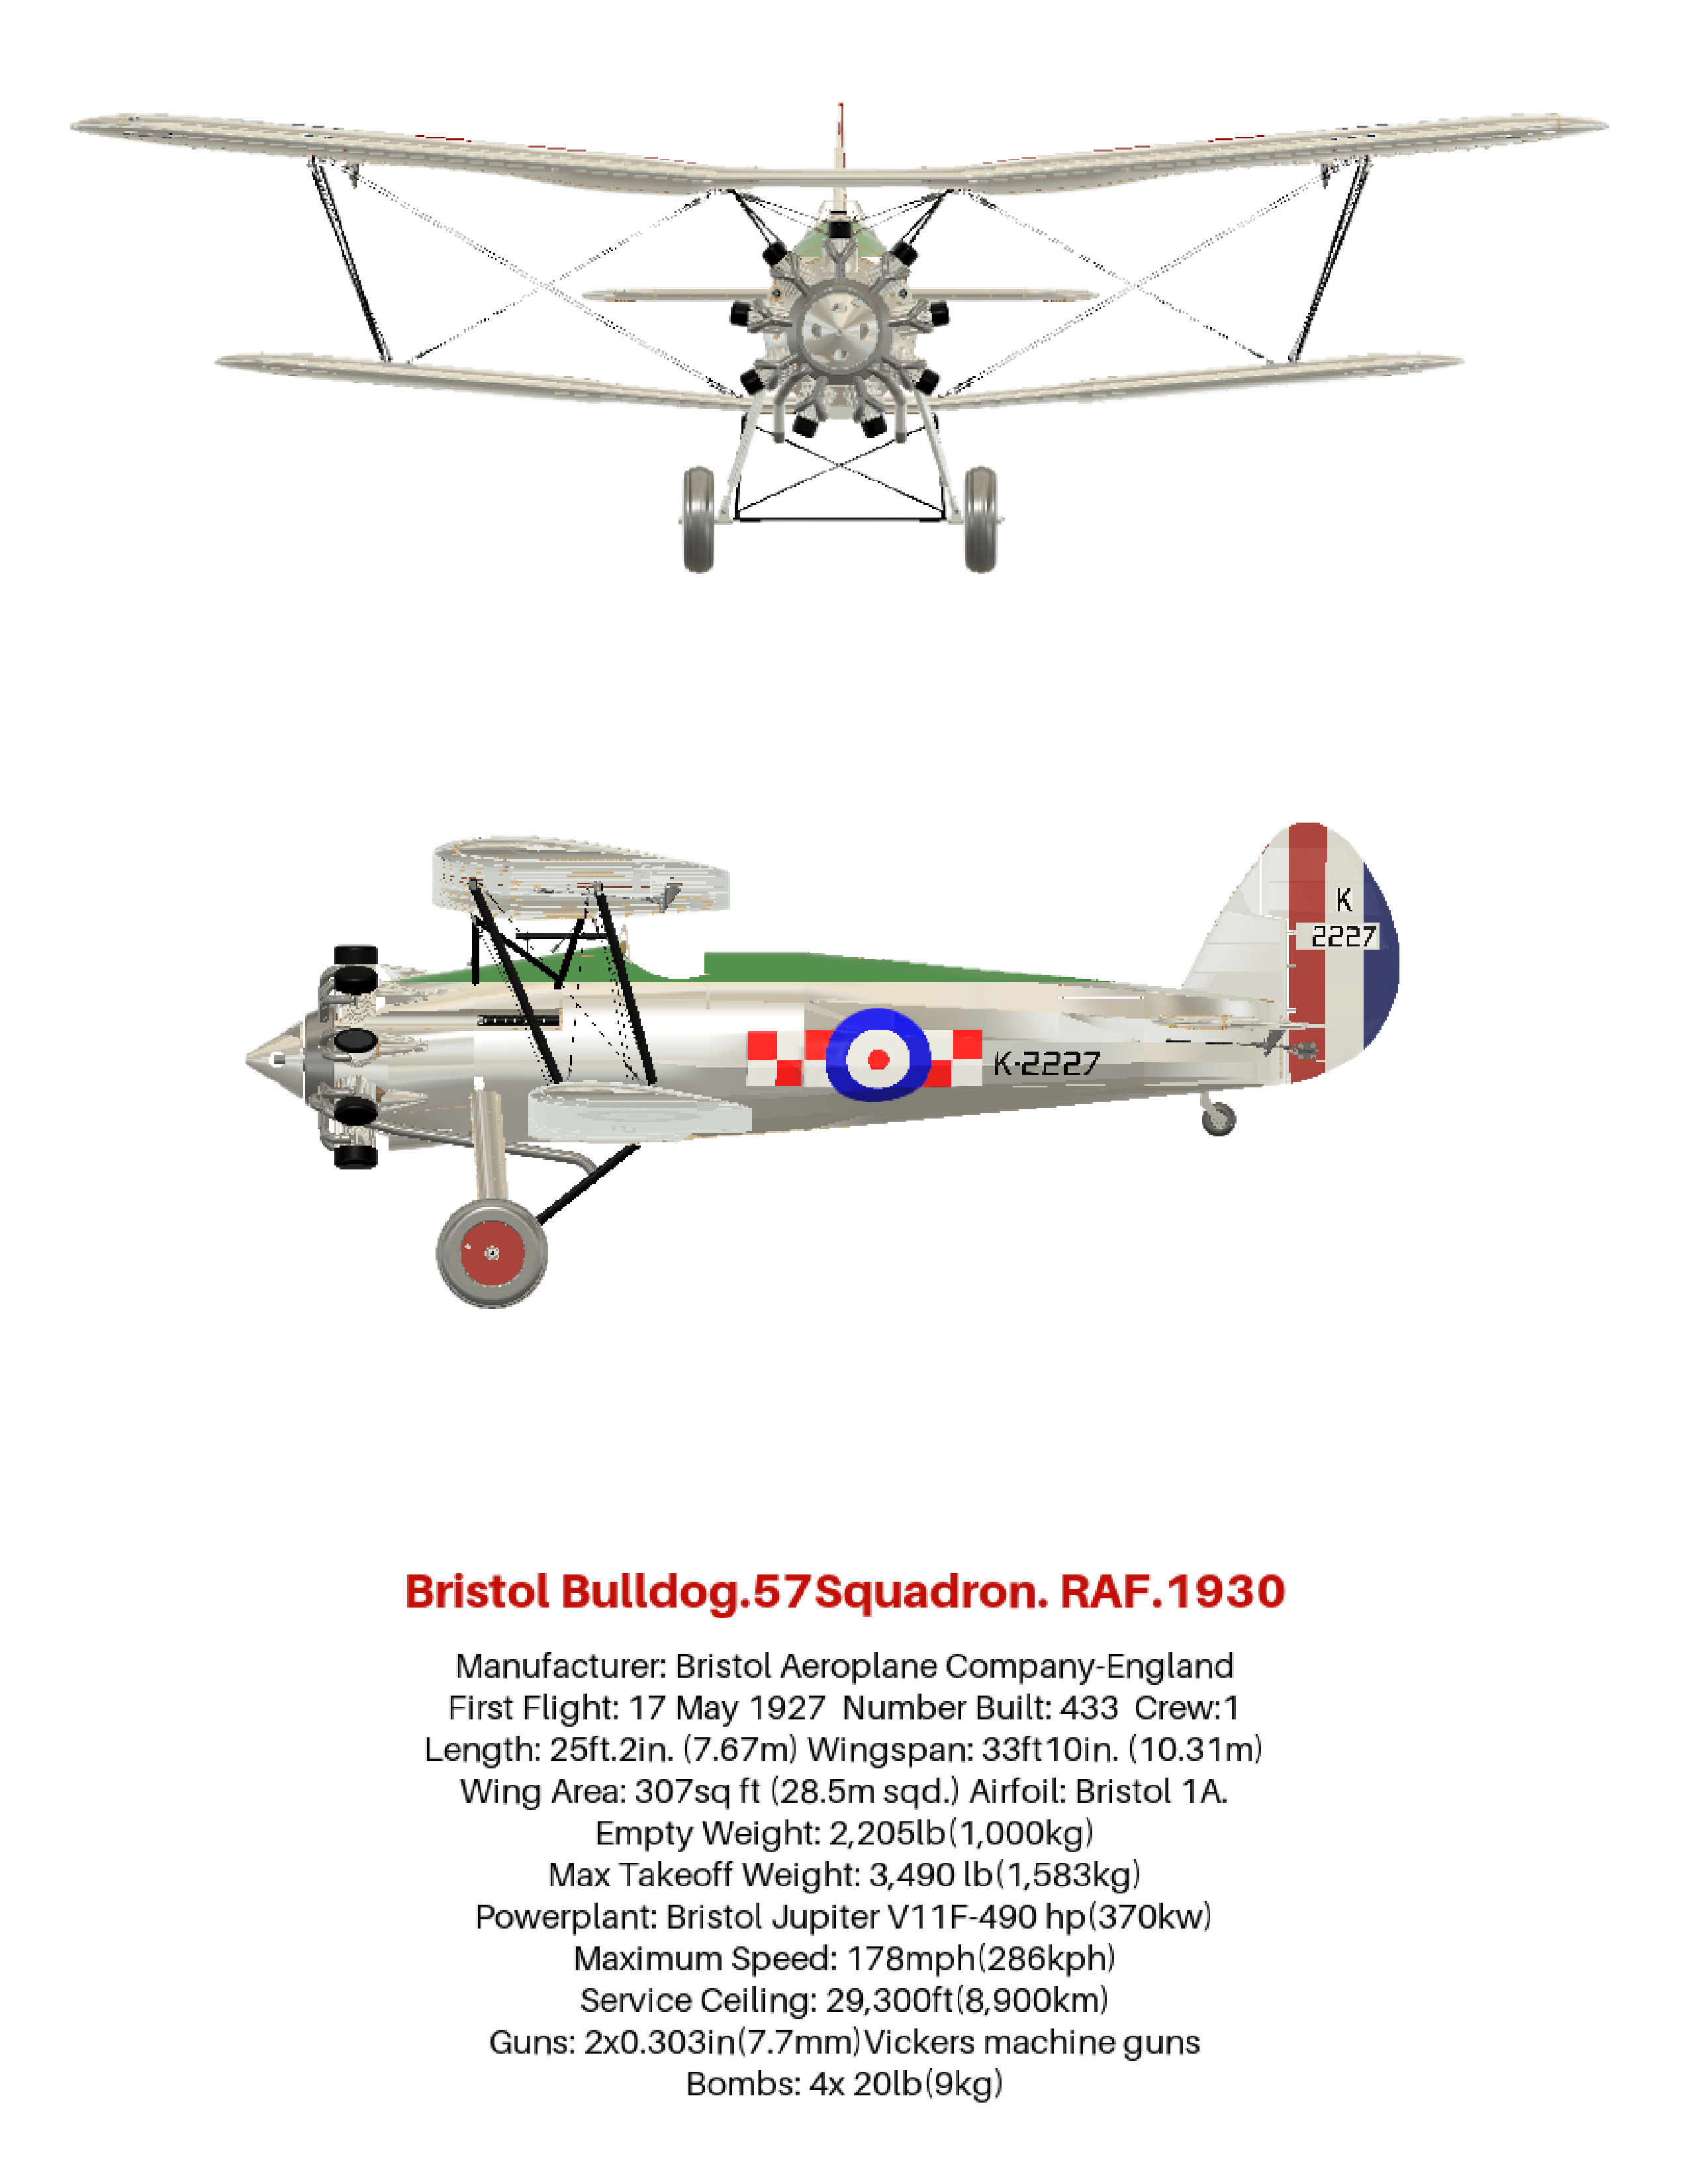 How the aviation art, of the Bristol Bulldog vintage biplane, was produced, using 3D software. Included are photos and links to many aviation gifts, from Zazzle
 -
Aviation gifts For All Airplane Lovers
Apr 20, 23 11:12 AM
 Aviation gifts for every occasion. Give your airplane fanatic friends and relatives the present they will really appreciate! Can be customized to make it truly unique.
 -
RC Retractable Landing Gear: The JP Hobby ER-005 Metal Strut Set.
Dec 19, 22 01:55 PM
 Full details of RC retractable landing gear. For models up to 6 Kg (13.2 lbs). Steerable nose wheel and sequencer for gear doors and brakes. For grass strips.
 -
FLEX RV-8 70CC FLS:ARF and ARFSV.
Nov 02, 22 02:45 PM
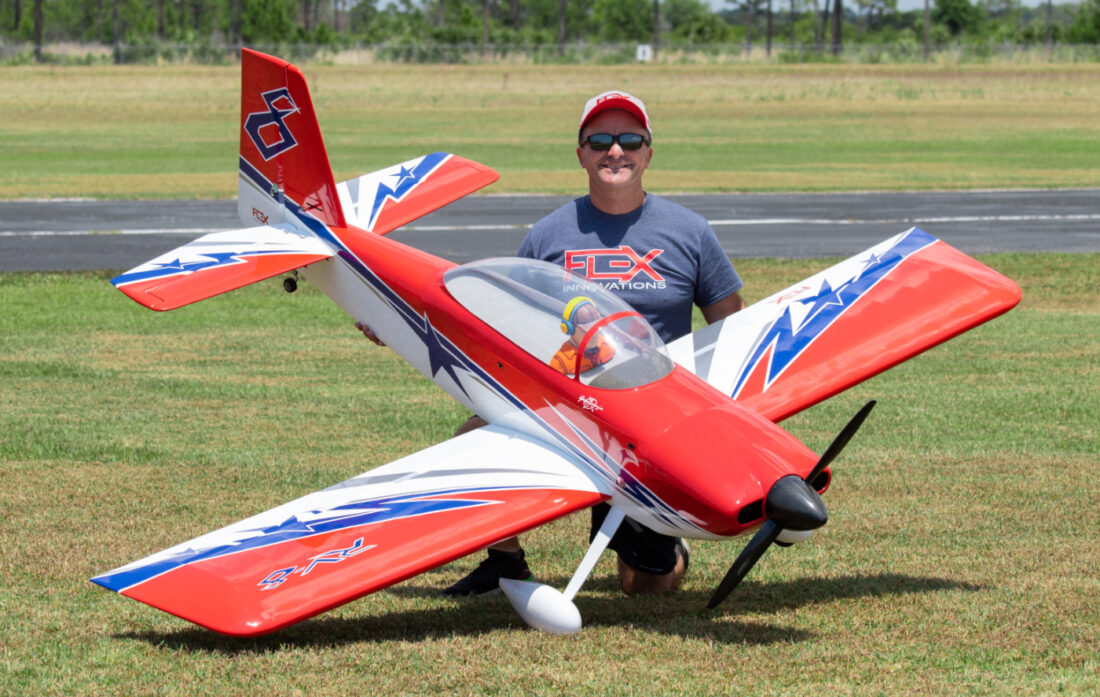 The Flex RV-8 70cc, 35% Scale, 3D RC Airplane. Super lightweight and gas or electric power. Very complete and fast assembly.
New! Comments
Have your say about what you just read! Leave me a comment in the box below.