The Parkzone Stinson Reliant
The Parkzone Stinson Reliant is a beautiful "Golden Age" Electric RC plane. Completely ready to fly.
The real Stinson Reliant first flew in 1938. Parkzone have faithfully reproduced this great looking scale RC airplane in Z-foam.
Scale features abound, from the landing gear and scale cowl and dummy radial engine to the molded rib reproduction on the wing and tail plane.

The Parkzone Stinson Reliant described
Assembly time is typical of Parkzone and only requires simple assembly techniques. I would not recommend this RC electric plane as your first model-take a look at this page-"Hobbyzone Super Cub" for a more suitable beginner RC plane.

The one piece tail plane slides through slots in the rear fuselage and rudder. The plastic fairing is already installed in the rear fuselage.
Plastic covers are then screwed on to the sides of the rudder, to finish off the assembly.
Tape is then applied to the plastic fairing, to retain the tail plane. Note that paint will be stripped off, if and when the tape is removed, so keep the tape away from painted areas.
It only remains to install the pushrod clevis into the elevator control horn. Snap it into the outermost hole and slide the silicone retainer over the clevis.

The landing gear is in two parts and each half bolts to the plastic fairing on the bottom of the fuselage.
Be careful not to loose the screws into the cavity in the fairing. A magnetic screwdriver would be very good for this application!
One criticism I came across was that the wheel axles come loose. It would make sense to apply a little thread locker to all the screws in this area.

Nice view of the cowl assembly. There is no assembly to be done in this area! This is how it comes out of the box.
If you take more than an hour to build the Parkzone Stinson, then you really are a slow builder!

One very nice feature is the optional flaps. An additional RC servo is required to be installed in the wing root and all of the required hardware is included.
A look at the Flap Installation Video will show you how simple it is to install the flaps and the extra fun they add to this model make them well worth while.
The flaps need to be cut away from the wing, but the actuating levers are already installed. The servo is supposed to be glued in with a "removable glue". A tip I picked up is to tape the servo with a good brand of masking tape ( just one layer) and glue the tape to the model. When the servo needs to be removed, just remove the tape!

The photo shows the correct servo. It is a Parkzone PKZ 1090. This is a 3-wire digital servo with metal gears.
Kit Contents:
- Complete fuselage. with receiver, motor, speed controller, prop (9.5x7.5). Pre-hinged rudder.
- Rudder and elevator servos installed.
- A one piece wing assembly with aileron servos (2) installed, as well as control horns. Pre-hinged ailerons.
- Horizontal stabilizer with pre-hinged elevator. Control horn installed.
- Landing gear assemblies with fairings and wheel pants(2)
- Parkzone 480 size outrunner brushless motor (960 Kv)
- Wing struts (2), rudder cover plates (2), bind plug, adhesive tape strips, flaps push rod.
- Li-Po battery-1800mah 3S 15C
- Parkzone 2-3 cell balancing charger
- Complete hardware package with spare pieces.
- Excellent manual, in 4 languages. ( 21 pages per language)
- Adhesive backed hook and loop tape.
- Speed control instruction sheet, LVC setting notice, control throws addendum.
Extra Components Required:
- 4-channel RC transmitter, 5 with flaps, DSM@ or DSMX compatible. (Spektrum DX6i is ideal)
- Flap servo and extension if this option is required. (See above)
- Spare LI-Po battery, for less time between flights.
Unfortunately this model is no longer available-sorry!

Get Gloster Gladiator Profile eBook Free

Don't worry your e-mail address is totally secure.


Recent Articles
-
The Bristol Bulldog vintage biplane, of the RAF, in 1930
May 22, 23 10:47 AM
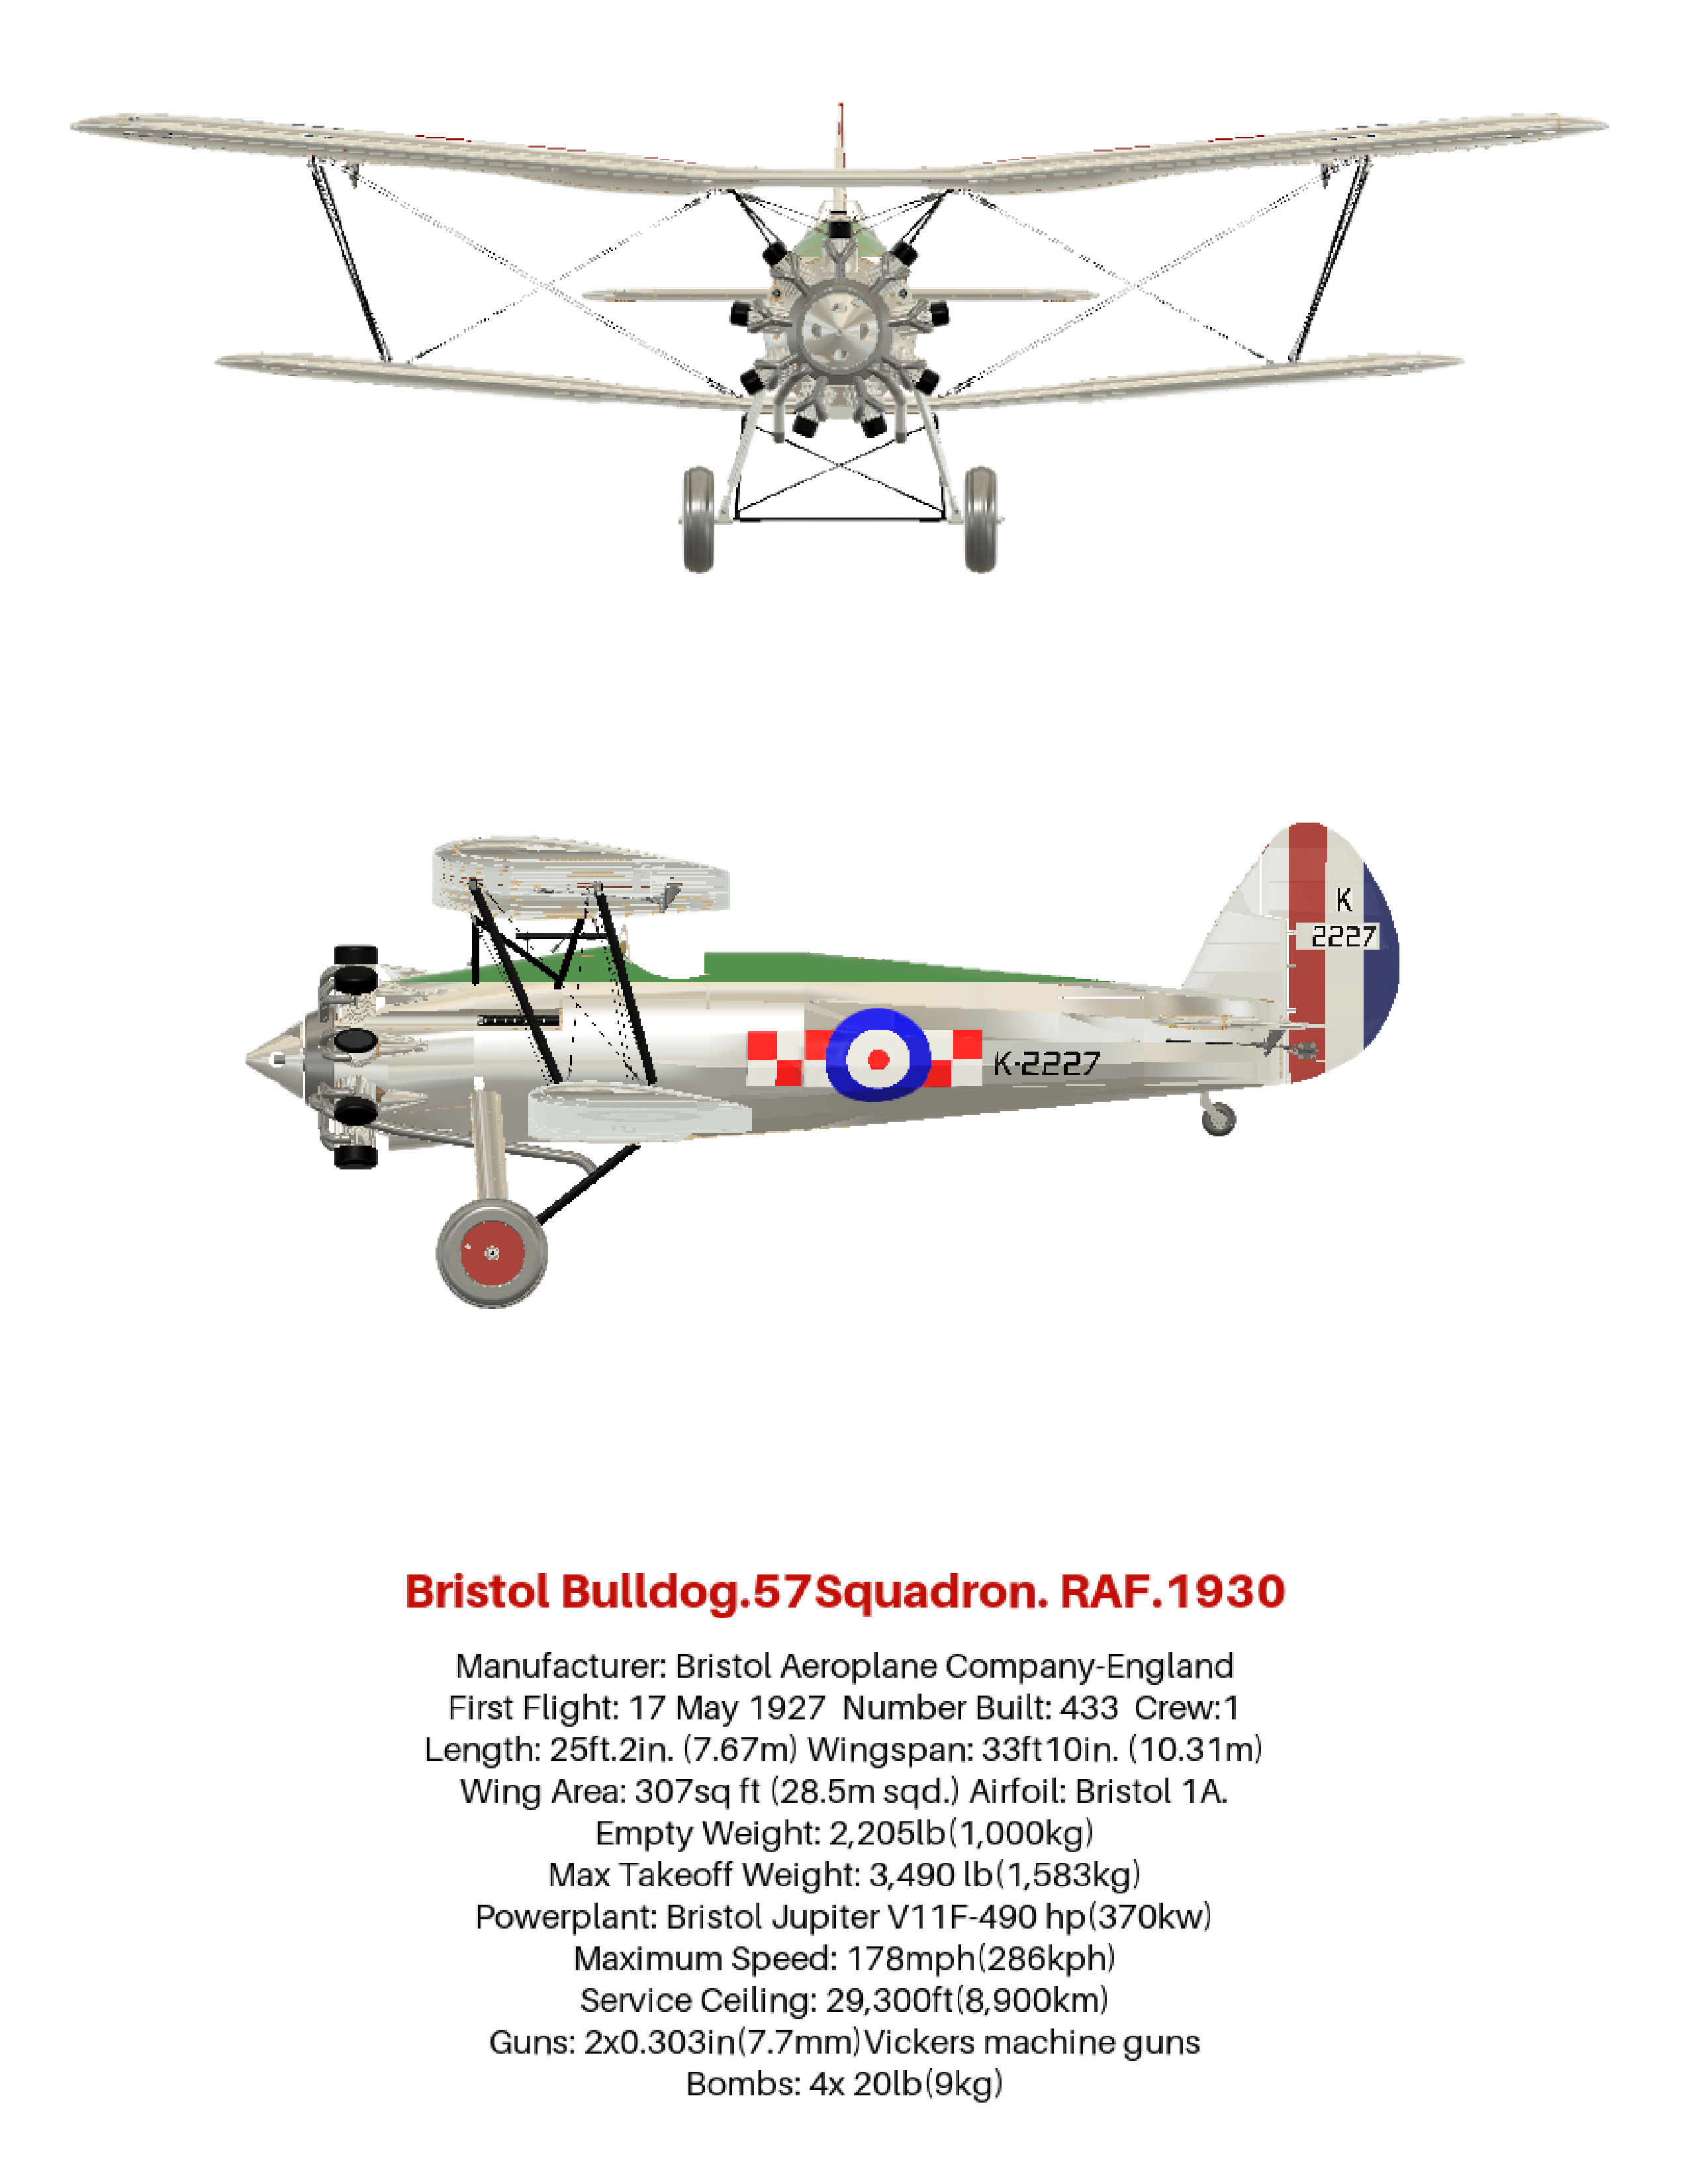 How the aviation art, of the Bristol Bulldog vintage biplane, was produced, using 3D software. Included are photos and links to many aviation gifts, from Zazzle
 -
Aviation gifts For All Airplane Lovers
Apr 20, 23 11:12 AM
 Aviation gifts for every occasion. Give your airplane fanatic friends and relatives the present they will really appreciate! Can be customized to make it truly unique.
 -
RC Retractable Landing Gear: The JP Hobby ER-005 Metal Strut Set.
Dec 19, 22 01:55 PM
 Full details of RC retractable landing gear. For models up to 6 Kg (13.2 lbs). Steerable nose wheel and sequencer for gear doors and brakes. For grass strips.
 -
FLEX RV-8 70CC FLS:ARF and ARFSV.
Nov 02, 22 02:45 PM
 The Flex RV-8 70cc, 35% Scale, 3D RC Airplane. Super lightweight and gas or electric power. Very complete and fast assembly.