RC Mosquito: The Freewing Foam (Not Wooden!) Wonder
The Freewing RC Mosquito is a 55in. wing span foam warbird that assembles well and flies super.
 Photo is by Motion RC
The Full Size Mosquito
The de Havilland Mosquito first entered service with the RAF in 1941. The twin Rolls Royce Merlins and clean aerodynamics gave it a top speed of over 400MPH.
It was constructed of almost entirely wood, including balsa! The wood was molded into the curved shapes and bonded together. It became known as the "Wooden Wonder" and the crew affectionately referred to it as "Mossie"
Initially intended as a light bomber it was also successful as a night fighter and photo reconnasance
For more information, CLICK HERE to visit the Wikipedia page
The Freewing RC Mosquito Described:
- This is an all molded EPO foam 'Mossie", made in the Far East and imported into North America by Motion RC.
- It features counter rotating propellers that counteract torque and an all electric retract system with sequenced doors. The retracts feature heavy duty construction and shock absorbers and are said to work well on grass.
- All surfaces are hinged with nylon "Robart" style hinges.
- 2 Brushless motors,2 ESCs, and 7 servos installed -Rudder,elevator, ailerons(2), tail wheel, retract doors (2)
- LED navigation lights are installed
Extra equipment required
- 6 channel (Min) Transmitter and receiver.
- 4S 14.8V 2200mAh (or higher) Lipo (Plenty of room for larger batteries)
- Lipo battery charger
Ordering and Delivery
I started to order online, from the Motion RC web site and was pleased to see that orders over $99.00 offered free shipping. Imagine my disappointment when I learned that this did not apply to shipping to Canada and I presume all international shipping.
The price increased by over $55.00 and to add insult to injury, I had to pay a $30.00 'Brokerage fee" upon delivery.
The time taken to ship was good at less than 5 days.
I did phone Motion RC, to confirm the extra charges and did also ask if flaps could be added.
Regarding the flaps, there are pockets molded into the wing for servos but it was advised that flaps were not required, so I did not add them.
 Nothing beats the smell of a brand new airplane, in the box!
Here we can see how the parts are packed. Only the fuselage was in a plastic bag but all parts were as they left the factory with no damage at all. Excellent packing job!
The Kit

These are all the parts of the RC Mosquito laid out. The quality of the injection molded foam parts is first class and the engineering generally very good.
One point I would like to make is that the paint that is used is very delicate and hangar rash can soon develop!
Epoxy is used in the major part of the assembly and the paint will dissolve by coming into contact with alcohol.(That I use to clean up epoxy) So be extra careful!
The Assembly

Building the RC Mosquito is not difficult But it is not a 5 minute job! Be prepared for a few hours of interesting work.
Please take a look at the excellent video, that is quite long but well worth the experience. It spends a lot of time showing how to assemble the landing gear doors, which I followed and found to be successful.
Other points I learned from the video were the revised CG position and also the advice regarding removing one of the ESC power wires. This I did not know about and was glad that I was told!
The Manual
The manual is the usual poor English type that we have come to expect from Chinese companies! Why manufacturers will not hire a proficient copy writer who would produce a readable manual is beyond me!
The photographs are good but sorting out the screws, to find out which ones go where, was a frustrating task!
Let me tell you now that the longest screws, with the washer head are used to hold in the landing gear. This tip will save you a lot of time.
Building Notes

All in all it was a very enjoyable experience. I am more used to the balsa/ply type of RC airplane and had to learn a bit about working with somewhat delicate foam.
Assembly of the 3-bladed spinners and prop. blades was a case of making sure that everything fitted. Removal of sharp edges and constant checking to ensure nothing was stressed when screwed together ensured positive results.
The navigation lights worked and sometimes not worked, I am sure this is due to my incompetence but I cannot see them, in bright sunlight, so I will disconnect them.(I do not plan to fly at night!)
Photo Gallery


Zazzle Mosquito Gifts
 |
Click here for details of t-shirts, coffee mugs, mouse pads and lots more. All feature the unique artwork shown here and is customizable. |

Get Gloster Gladiator Profile eBook Free

Don't worry your e-mail address is totally secure.


Recent Articles
-
The Bristol Bulldog vintage biplane, of the RAF, in 1930
May 22, 23 10:47 AM
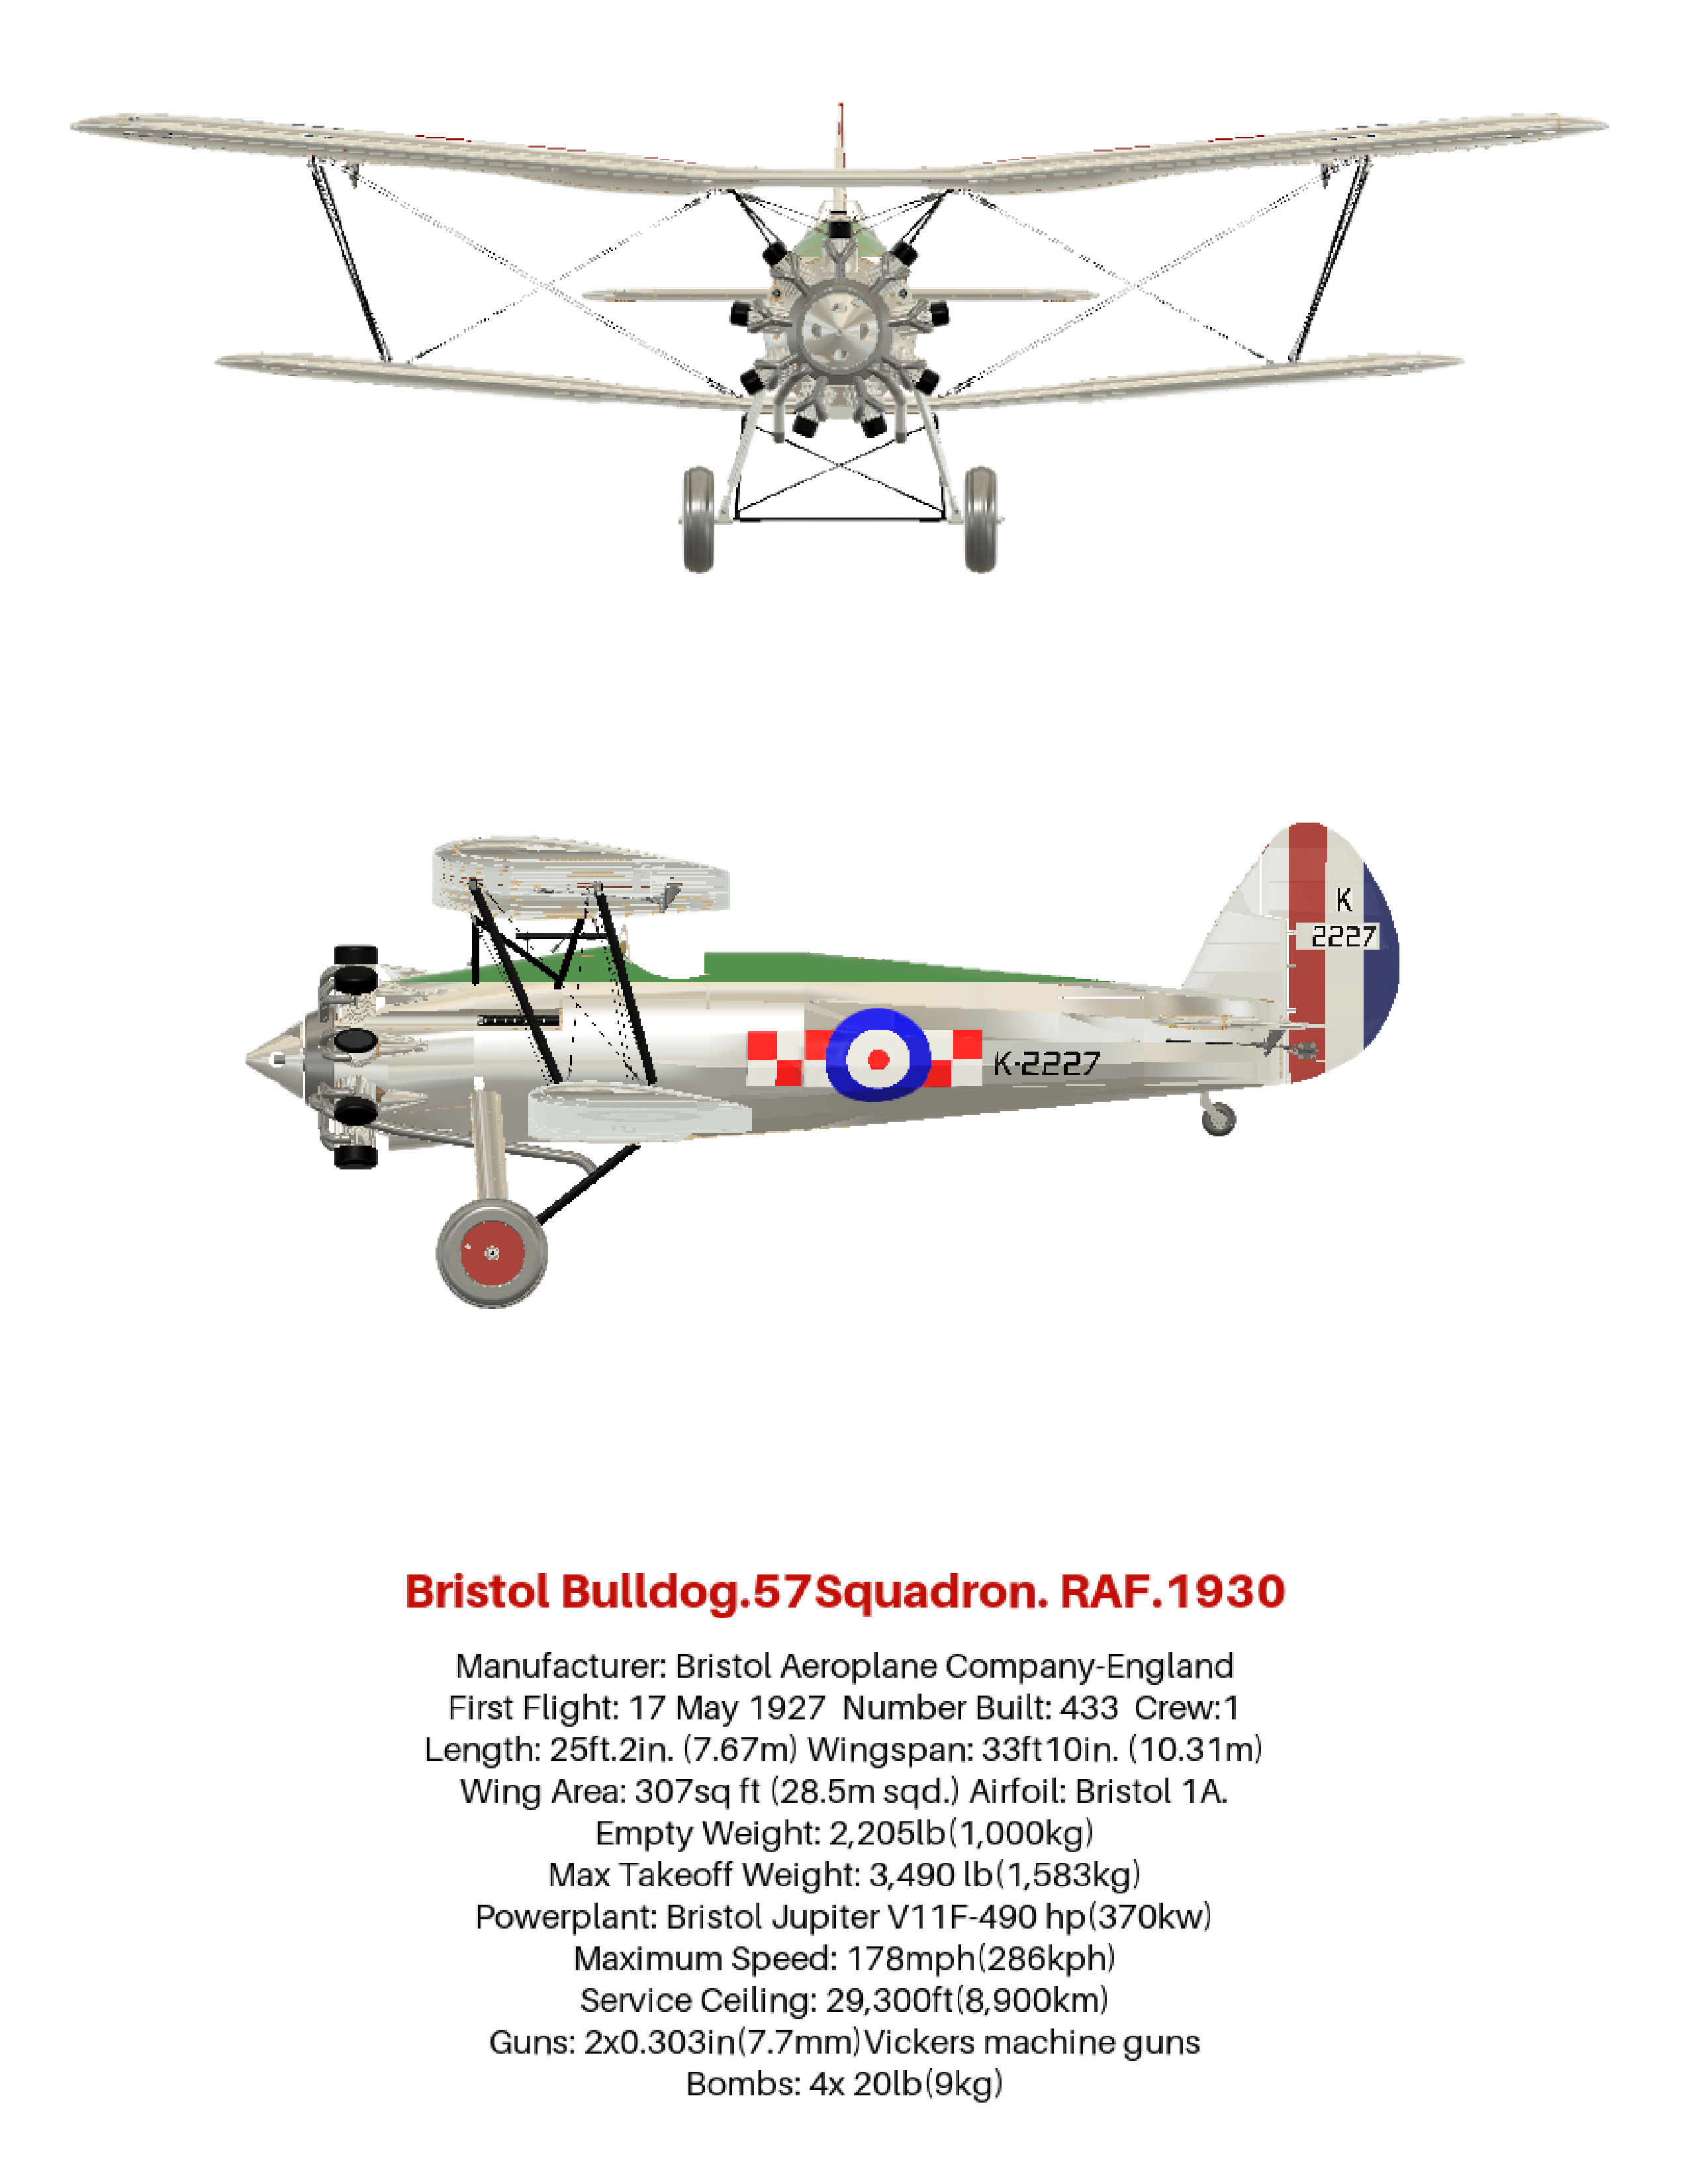 How the aviation art, of the Bristol Bulldog vintage biplane, was produced, using 3D software. Included are photos and links to many aviation gifts, from Zazzle
 -
Aviation gifts For All Airplane Lovers
Apr 20, 23 11:12 AM
 Aviation gifts for every occasion. Give your airplane fanatic friends and relatives the present they will really appreciate! Can be customized to make it truly unique.
 -
RC Retractable Landing Gear: The JP Hobby ER-005 Metal Strut Set.
Dec 19, 22 01:55 PM
 Full details of RC retractable landing gear. For models up to 6 Kg (13.2 lbs). Steerable nose wheel and sequencer for gear doors and brakes. For grass strips.
 -
FLEX RV-8 70CC FLS:ARF and ARFSV.
Nov 02, 22 02:45 PM
 The Flex RV-8 70cc, 35% Scale, 3D RC Airplane. Super lightweight and gas or electric power. Very complete and fast assembly.
New! Comments
Have your say about what you just read! Leave me a comment in the box below.